Let’s face the harsh reality of many plant lovers: if you have houseplants, chances are you will eventually have to deal with pests.
Are you growing a Pothos, a fiddle leaf fig tree, or have more than a few exotic tropical (i.e. aroid) plants at home, like Anthurium, Alocasia, Monstera, Philodendron? Or maybe you are into succulents or more into orchids. Regardless of the plants that you grow indoors, I am sure that you already know that your plants thrive whenever their care needs are met, TLC being the keyword here. Sometimes, however, despite your very best efforts and pristine plant care routine, you notice that your houseplant looks a little worse for the wear.
Although you may take great care of your houseplants, your beautiful indoor garden might too become the target of pest or mites infestation. Bare in mind here: don’t jump in panic at the first bug or spot on a leaf you see – a couple of bugs don’t automatically equal the doom of a plant. Rather, if you suspect or know for sure that your green darling is getting terrorized by miniature unwanted visitors, it is time to take action immediately to avoid a full-blown infestation, because yes: if pests are left uncontrolled they can quickly multiply and turn your favourite plant into a sad picture.
If you are here, you might suspect or know that your houseplant is suffering from a pest problem. I feel you. Fret not, you’ve come to the right place. In this article you will learn a few tips on how to identify the six most common houseplant pests: spider mites, thrips, aphids, mealybugs, scales and fungus gnats. Also, how to get rid of pests on houseplants for good and a few tips on how you can avoid pests on plants in the future.
So roll up your sleeves and let’s get rid of unwanted visitors on your plant family right now.
This post may contain affiliate links. Read our full Privacy Policy and Disclosure here.
How to Identify and Control Houseplant Pests
Houseplants usually do not get attacked by pests as often as outside plants. However, indoor garden pests are a nuisance that occasionally, you might have to deal with being a plant parent. Don’t worry though, we are here to share our first-hand experience and knowledge in order to help you identify, prevent and manage pest infestation on your indoor plants.
I want to start with something with 2 important things:
- Pests are attracted to sick and stressed plants
- High-nitrogen content in plant tissues attracts pests
Pests are no fun in any way, this is why, when dealing with any plant-related problem the best approach is avoiding having it in the first place. Thus, it is important to check your plants regularly for signs of pests so that you can act immediately, as bugs are much easier to control when their numbers are low and a real infestation has not yet occurred. A good plant parent care routine: check your plants every time you water them. Keep in mind that usually, younger leaves are much more vulnerable to infestations.
The first step to getting rid of pests on plants is identifying a houseplant pest problem. So let’s start by looking at what are the tell-tale signs that you might be dealing with pests on your plants.
Spider Mites
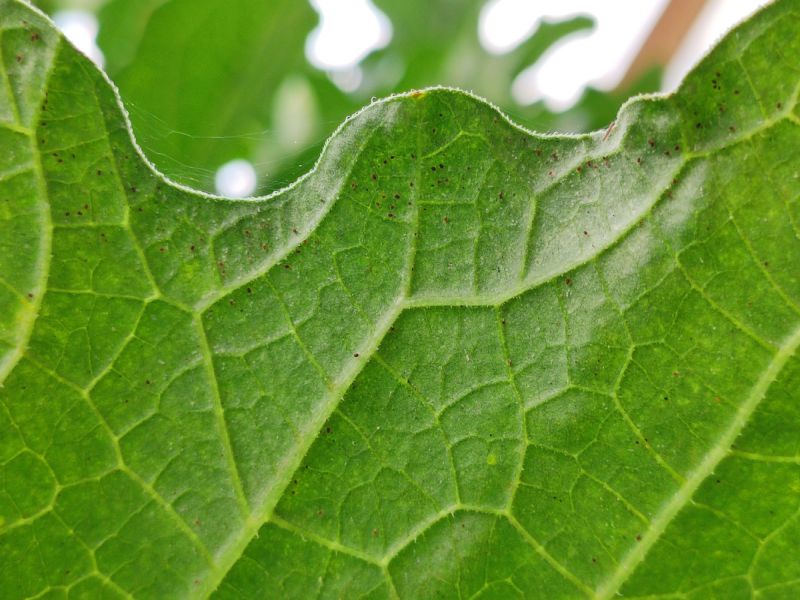
Spider mites are small and are hard to see. To top that up: there are different types of spider mites, so they vary in color. However, the most common type is the two spotted spider mite. If you manage to spot it on the underside of a plant’s leaves: it looks like a tiny darker but somehow also cloudy-colored speck that has two spots on each side of its body.
Usually, if you have a spider mites problem, you will first be able to notice either the webbing that spider mites leave behind or the damage that they have caused to a plant. Notice the webs formed around the leaf on the image below, these are spider mites.
These pests (like most pests, actually) are usually found on the underside of a plant’s leaf, where they can feed by rupturing the cells undisturbed. Yucks! Spider mites sap out the juices from the plants’ foliage, thus, causing leaves to wilt, yellow, and drop off. Spider mites can spread fast, thus, identifying that you might have a spider mite problem is key in dealing with those little crawlers to avoid the infestation growing and spreading to your whole plant family.
Spider mites prefer plants with juicier leaves, such as dracaena, fig trees, banana, strelitzia, alocasia, philodendron plants – especially those with more velvety leaves, like Philodendron Verrucosum, Gloriosum, Glorious, etc.
Signs and symptoms of spider mites on plants:
- yellowing of the leaves; yellowing at the edges of the leaves
- wilting of the foliage
- little spider webs around the base of the pot or on top of the soil
- spider webs on the back side of the leaves, especially inspect around the veins on the foliage and the leaf petiole
- little specks on the leaves that appear almost translucent – these spots are usually tiny, and look as if you poked the leaf with a needle a couple of times
- stunted growth of the plant
- test if you have spider mites by grabbing a piece of white paper and positioning it below the plant/leaf. Gently shake the plant or tap the leaves and observe if anything falls on the paper and starts moving. If tiny darker specks start running around after the shake test, chances are, it’s spider mites.
- and the most obvious one: you see super duper tiny bugs crawling on your leaves. Ouch. Make sure to check the underside of the leaves as spider mites just love hiding in there. They can be pale white-creamy, and can also be reddish to brown. They are super duper tiny so do not blame yourself if you have missed them previously!
If you found spider mites or highly suspect that they might be troubling your plant or plants, it’s time to take action. As mentioned, spider mites can spread fast so you must eradicate the problem while the mites have not had enough time to spread. Continue reading to find out how to get rid of mites on houseplants.
Extra tips when dealing with spider mites on your plants:
- Spider mites are especially attracted to plants when the weather gets hot and the humidity is low. Keeping a high level of humidity can help prevent spider mites from attacking your plants.
- Most often than not, older (lower) leaves show signs of a spider mite first. These pests usually move upwards on a plant, so your plant’s oldest leaves might be the first to get attacked followed by newer growth.
- Spider mites target and prefer plants with “juicier” foliage. Aka your Rosmarin will probably be fine, while your Banana is getting munched on.
- If you have spider mites use a miticide, not an insecticide!
Thrips
Thrips are possibly one of the most annoying bugs to deal with when having plants. They are even more annoying than the fungus gnat guys that just fly straight in your face. Not only do they sap out nutritional juices from plants but thrips also lay their eggs in the tissue of the plants they attack, yuck. This means that even if you use the most badass pesticide, their eggs might survive inside of the plant and then baby thrips come out and the whole cycle begins again. Ugh.
Thus, vigilance and patience are key when dealing with thrips, timely identification that you have a thrips problem is your best friend and a magnifying glass is always worth it in this case. Here are some of the signs that your plant might have a thrips infestation.
Signs and symptoms of thrips:
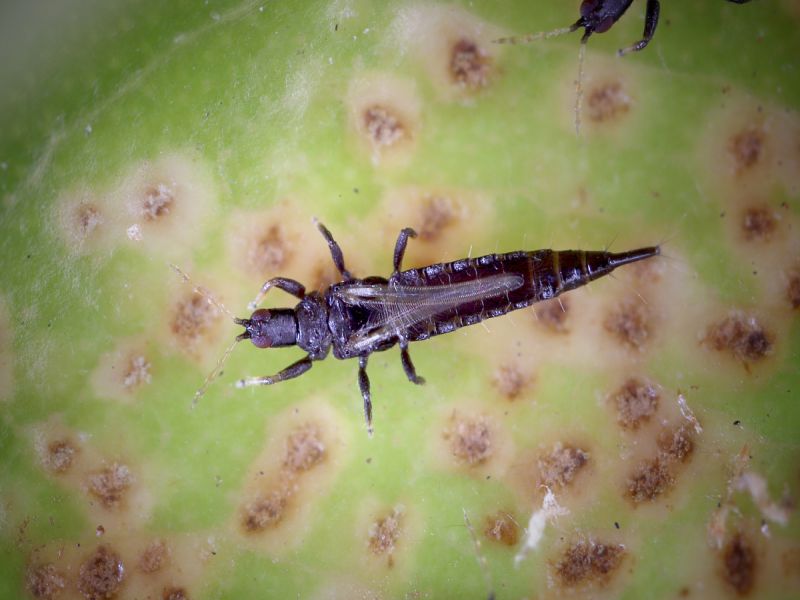
- If you actually see thrips on your plant – you have thrips. Those little bugs can be dark, can be white, have a slender body and are usually hard to spot on foliage. If you see even one: act fast, thrips do so should you. (magnifying glass does help!)
- Signs that thrips have been throwing a party on your plant are in most cases to be found on the underside of the leaves of a plant. Damage caused by thrips appears either as sort of silver caramel coloured speckled marks or…
- if you see little black dots. Those are thrips poop, ew.
- Thrips can lead to new growth on plants being stunned and distorted. This means that new leaves grow curled up and deformed and are visibly smaller in size compared to previous leaves.
- Blue cards can be helpful in identifying whether your plants have been infested by thrips. The blue colour (as opposed to yellow) is more attractive for thrips. Make sure to position the blue cards at the level of the leaves and not the level of the soil as most thrips will be found on the actual foliage since they lay their eggs on the plant itself as opposed to fungus gnats which leay their eggs in the soil.
- Test if your plant or plants have thrips by placing a white paper below the plant/leaf. Gently shake the plant or tap the leaves and observe if anything falls on the paper and starts moving.
Extra tips if your plants have thrips:
- Thrips are attracted to humidity, especially if the top of the soil is moist and here it goes without saying, they are especially attracted to Monstera and carnivorous plants. One way to prevent them is to bottom-water your plants whenever possible.
- Thrips love the new growing leaves as they are the juiciest and the easiest to sick out from (those bad boys!). Hence, damage from thrips can be spotted really easily on new foliage.
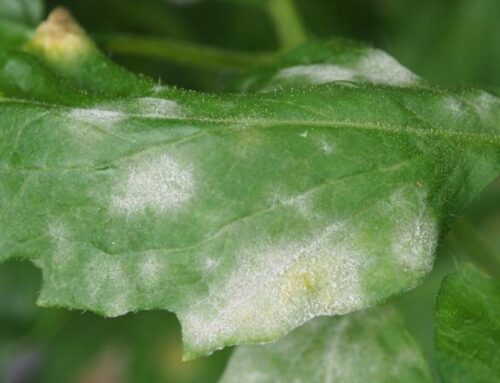
Mealybugs (soft shell scales)
Mealybugs are especially problematic because not only do they suck sap from your plants, they can also cause damage by injecting toxins into your plant while feeding, thus, causing deformations on new growth.
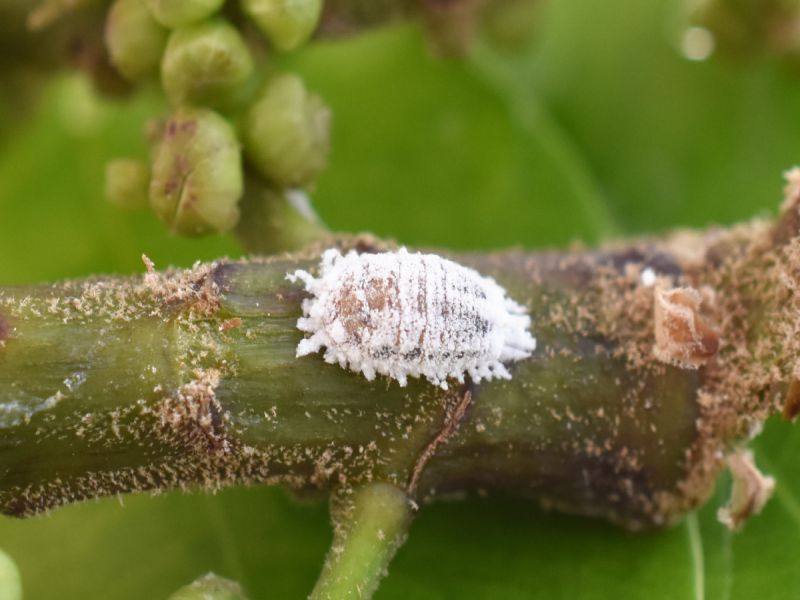
The female mealybugs are quite easy to spot on – they look like soft scale-like bugs that are on your plant. A bit like soft creamy turtles crawling all over. The male ones, however, can have wings and look like white flies which makes them hard to spot on but the signs that mealybugs leave on a plant are a good tell-tale of their presence. The image below shows a mealybug on a plant.
Mealybugs are especially attracted to hoya, succulents, jade, etc.
Signs and symptoms of mealybugs:
- Little white to off-white cotton balls on plants. It looks like cottonwool
- Black, sooty mold spots
- The plant feels “sticky” upon touching it
- Yellowing and wilting leaves. In the case of succulents (like the string of pearls (Senecio / Curio Rowleyanus), for example), the plant’s leaves rapidly appear drying out and dying
- Distorted/stunned plant growth
Armoured Scales
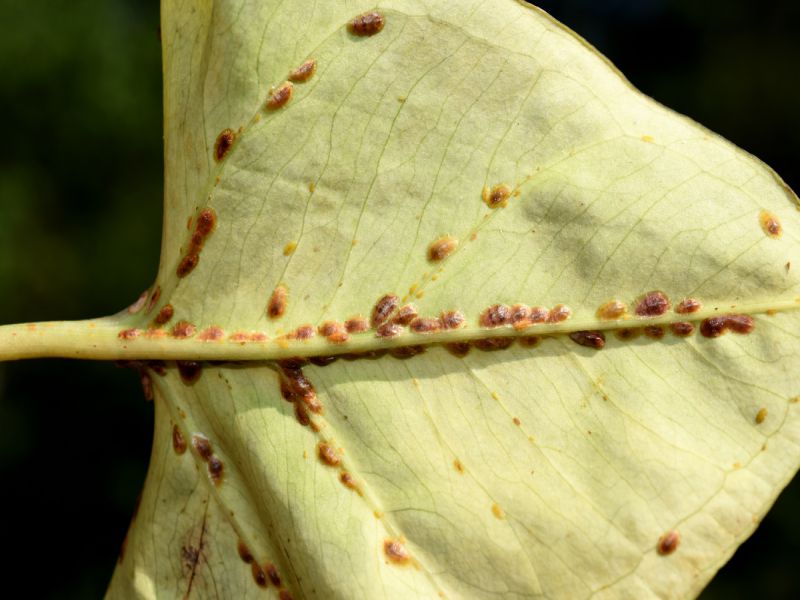
Armoured or hard-shell scales are sneaky to spot and identify. This is because these type of scale hardly look like bugs, they look like… ehm, scales? If you notice some unusual scale-y spots on your plant that you can remove with your thumbnail, chances are, it might be a scale that you just removed.
Check out the image below and if your plant has anything on it that looks similiar to the photo, looks a bit under the weather and if you can scrap it off with your nail tip, it’s quite possible that you have scale insects.
Signs and symptoms of scales (apart from seeing them):
- Sticky leaves – they also excrete honeydew, which could, in turn, lead to sooty mold and fungus. Bad stuff.
- Stunned/deformed plant growth.
- Yellowing and wilting leaves.
- Many scales are actually found mostly on stems rather than on the leaves per se so make sure you inspect there.
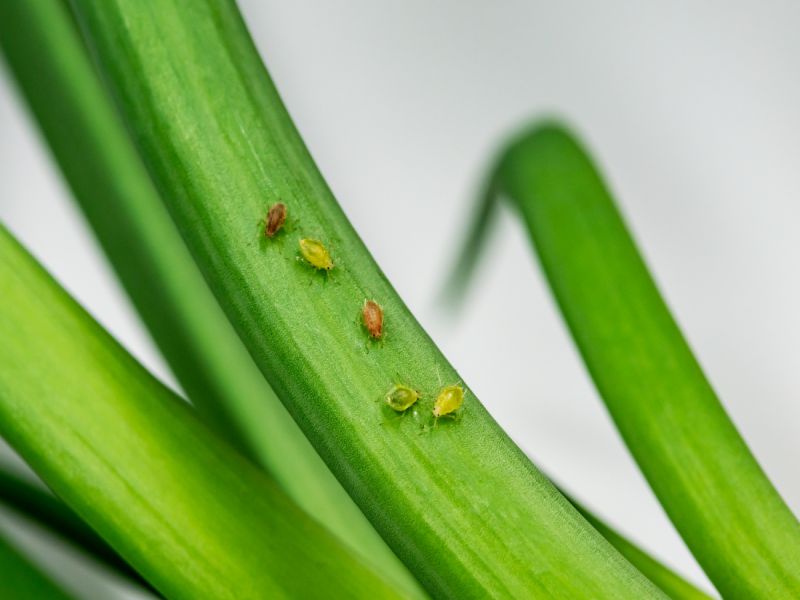
Aphids
They are like thousand different type of aphids. Green ones, black ones, flying ones (?!)… No need to go into detail, they are all bad but the good news is that aphids usually attack only outdoor plants so chances are that your indoor babes are safe.
Signs and symptoms of aphids:
- You see them! Honestly, the only good thing about aphids is that they are big enough to be noticed. It is as if they are almost waving at you like: hello, I am here, feeding on your plant, ha! They usually love hiding in the still unwrapped new leaves though, sneaky boobs. But most often than not, they cluster in colonies so they are easy to spot. It looks like a bunch of juicy bugs at one spot. Ew.
- Wilting and yellowing of the leaves and of the flowers of the plant (if the plant is of a flowering type)
- Distorted/stunned new growth
- Honeydew on leaves – the leaves feel sticky, which is especially bad as it can lead to sooty mold and fungus
Extra tip if you are dealing with aphids:
- The honeydew that they excrete attracts ants, so if you see ants coming in and out of a plant, inspect for aphids. The ants actually feed on the honeydew and thus, try to protect the aphids from other predatory insects.
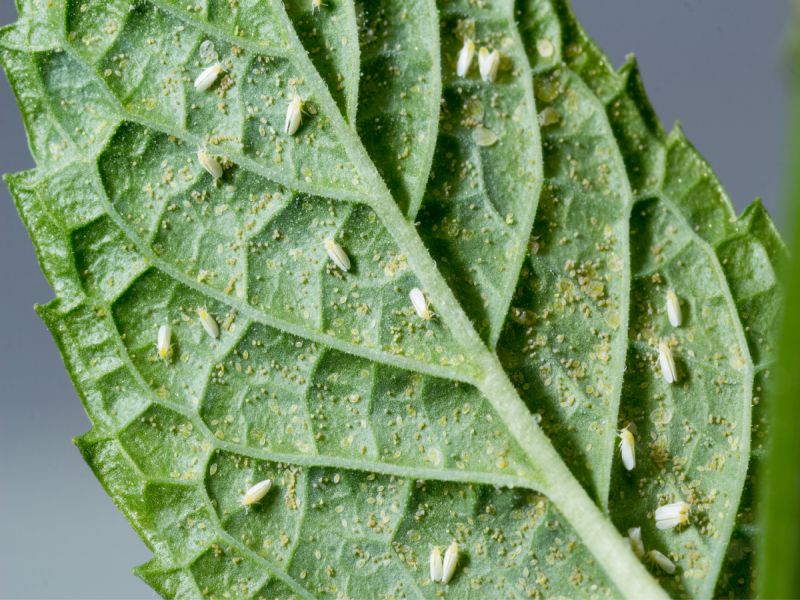
Whiteflies
Fortunately, albeit annoying, white flies are very rarely found on indoor plants. Phew! It seems that these white-winged creatures are mostly attracted to outdoor grown tomatoes, ivies, hibiscus, etc. Getting rid of white flies on garden plants requires a lot of patience and repetitive treatments. This is because, adult white flies quickly fly-off when disturbed and rarely get reached by pesticide, hence, their reproduction cycle is rarely impared. On the other hand, however, are the immature ones, i.e. the juvenile whiteflies or the larvae.
The larvae of whiteflies look a bit like mealybugs (soft-shell scale insects): white fluffy specks on the leaves that move (if at all) slowly. At the pre-adult stage, they rupture the cells on the underside of a plant’s leaves and feed massively, causing significant damage. The juvenile whiteflies don’t move as fast as the adult ones and can be easily targeted with pesticides. These tiny, winged insects have a delicate, powdery white appearance. The immature stage doesn’t move much, but the adults flutter about when disturbed. During both of its life cycle stages, i.e. the mature and the juvenile one, the whiteflies suck plant sap, however, they do so extensively while still in the larvae stage.
Female whiteflies lay their eggs on the underside of a plant’s leaves and usually, the eggs are ordered in a circular pattern. The whiteflies’ eggs change color during their growing stage, so beware of that too if you are on the hunt for them. They are off-white to pale yellow when they have just been placed and turn to darker, brown shade when the larvae are ready to hatch.
Signs and symptoms of whiteflies:
- If you are dealing with a whitefly problem on your plants, it is almost impossible to not notice it. This is because, as soon as you shake even slightly a plant, during watering it, for example, it seems as if a cloud of dust specks starts flying around it. And yes, whiteflies are well, white. They have tiny pale yellow heads but the larger part of their bodies, including their wings, are white.
- If infestation occurs, the plants will show symptoms of distress, i.e. wilting, yellowing leaves and stunned growth.
- You can use yellow cards or even blue cards to lure whiteflies into getting caught so that you can assess the severity of the problem. Hang the cards on the leaves of the plant, whenever possible. If little white flies start sticking to the cards (ugh, looks gross), then chances are, you have whiteflies.
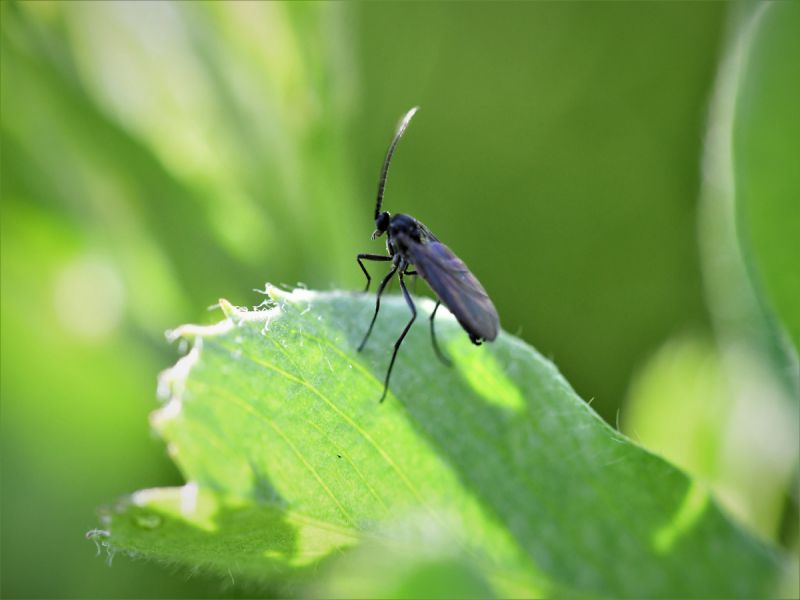
Fungus Gnats
Aka the most annoying ones ever. The good news about Fungus Gnats is that although they are really annoying to us, they rarely harm a plant (unless, of course, a real infestation occurs). Most of the fungus gnats come from soil that has not been sterilized properly, hence, the eggs that they have laid there, are able to hatch once proper conditions are presented.
Signs and symptoms of fungus gnats:
- If you have a fungus gnats problem, it is rarely (if at all) possible to not see it. Those little black flies are hard to not be noticed. They fly literally everywhere, and since they are concentrated the most around your plants, they especially love bumping into your face while you are checking on your planties (?!).
- If infestation occurs, the plants will show symptoms of distress, i.e. wilting, yellowing leaves and stunned growth. But I am sure that you would be able to spot and erradicate the fungus gnats before they become harmful to your plants.
- Use yellow cards and place them in the pot of a plant to identify if you have a fungus gnats problem. If little flies start sticking to the yellow cards (ugh, looks gross), then chances are, you have fungus gnats.
Danger level: N/A – really annoying to us humans but not so much for the planties, phew.
Extra tips when dealing with fungus gnats:
- They are most active during the period of late Spring and late Summer. They somehow mysteriously vanish in Winter so make sure to arm yourself with yellow cards beforehand.
With those main types of bugs that might damage your plant out of the way, you might wonder now: how do I get rid of pests on my plant? Read on then.
How to Get Rid Of Pests on Plants (for good):

First of all, I am sorry that you are here. I know from personal experience how devastating it can be to deal with pests that are attacking your precious plant-family but hang on. Pests are totally manageable and can be dealt with in no time!
Is your favourite plant being infested by bugs? Are you wondering how to get rid off pests on your plants once and for all? Then read on. Here is a step-by-step guide of how to treat your plant from a pests’ infestation:
- Isolate the plant from your other plants. Seriously, put it away like right about now.
- Give the infected plant a good shower. The more little bugs you manage to shower off – the lesser the fight.
- After the leaves have dried from that good shower that you just gave your plantie, spray the whole foliage (underside of the leaves too) with an insecticidal soap and repeat when necessary every 5-7 days for a good month .Insecticidal soaps are great as they are environmentally and bee friendly, and can be used on both indoor and outdoor plants (including vegetables and fruits).Here is how to make your own insecticidal soap and how to apply it properly:
– Please, make sure to test the tolerance of your plant first by spraying a small part of the plant with the insecticidal soap at first. Wait for 48 hours to see if the plant can handle it or if the solution would need to be further diluted. (*young plants are usually more sensitive and their foliage might easily get damaged so proceed with caution)
– mix 1 tablespoon (15 ml) soap with 1 litre (8 oz) water (* do not used dishwashing soap that contains bleach as it might burn the foliage of the plants and can be ineffective for the pests control due to lack of fatty acids)
– add neem oil as directed on the product label or alternatively, use 2 teaspoons of any oil that you have available
– use the mixture immediately to spray the entire plant throughoutly, storing insecticidal home-made soap for later use is not possible
– allow the plant or plants to dry naturally after using the insecticidal soap spray and keep them away from any direct light as this might burn the foliage - Alternatively to point 2 and 3, if your plant/s are small enough, you can use the insecticidal soap and give them a good bath. Allow them to soak throughoutly (pots, roots and all) in the insecticidal bath for 10 minutes before taking them out and allowing them to dry out naturally while keeping them away from any direct sunlight. Once again, repeat where necessary.
*If your pest infestation problem appears to be persistent, it is time for repotting as eggs might be lingering in your old soil. In which case: remove as much as possible from the old soil without damaging the roots of the plant, proceed with an insecticidal bath for 10 minutes and then repot the plant in fresh soil mix. Spray with insecticidal soap after 5-7 days and repeat where necessary. - If you want to go more agressive, you can also apply a insecticide/miticide and use as directed. Important: if you have spider mites, you need a miticide! Some insecticides (eg: containing acetampirid) can actually make a spider mites infestation worse as they kill natural predators of mites.
In most cases, pesticides would also need to be re-applied every week or so for about 3-4 weeks. Read the label carefully and always test first the tolerance of the plant by applying the pesticide on a small portion of the foliage. - We would suggest to keep the infected plant in isolation from the rest of your plant family members for a good month/ month and a half until you are super convinced that the little buggers are done and gone for good.
- Reintroduce the plantie that was in isolation to the rest of your plants.
- Give yourself a huge high-five. Congrats, you did it, go you! :)
Getting rid off Thrips:
You can follow the above points to successfully get rid off thrips from your plants and since they are extra persistent, here is an extra trick. Thrips have a stage in their life cycle during which they are actually in the soil and not feeding on plant tissue. That is why, you can also use diatomaceous earth (make sure it is food-grade) and sprinkle liberally the whole surface of the infected plant. The earth will need to be re-applied after each watering as it becomes “inactive” once wet, so wait about two days after watering your plants before applying diatomaceous earth. Alternatively, you can also bottom-water your plants and apply it immediately. Diatomaceous earth works by drying out the exoskeleton of the larvae that are coming out, hence, killing them.
Because of the life-cycle of thrips, you would ideally proceed with insecticidal treatment for good 4-6 weeks. Make sure to rotate the insecticides that you are using, so that thrips will not become resistent to them. For thrips, it is best to use systemic insecticides that are offering longer-term protection to the plant. A well-working combination of insecticides for thrips is the usage of: an insecticide containing acetamiprid on week 1, and the treatment should be continued on week 2 with an insecticide containing spinosad. Week 3: acetamiprid, week 4: spinosad, and so on.
Getting rid off Fungus Gnats:
All of the above points apply to fungus gnats as well but here are some extra details about how to deal with these annoying flies.
The best way to deal with fungus gnats is to actually do your best to avoid having them in the first place. This includes always ensuring that the potting medium that you are using is sterilized. Also, ensure that the pots in which you are planting your green darlings have been properly cleaned and disinfected. Bottom-watering your plants can prevent fungus gnats’ eggs from hatching as they enjoy a moist environment and have the habit of laying their eggs at the top inch of the soil. Yellow cards can also be extremely helpful in terms of lowering the population of fungus gnats as the little flies are attracted to the bright yellow colours and stick to the cards. Diatomaceous earth can also be used to deal with fungus gnats. Make sure that the diatomaceous earth that you are using is food-grade and sprinkle liberally on top of the soil of the plant having a problem. As the eggs hatch and start coming out of the ground, the earth will dry out their exoskeleton. If you have a real fungus gnats infestation, consider repotting your plant/s and washing the roots from the old soil as good as possible.
How to Keep Your Plants Free From Pests
As mentioned earlier, the best way to deal with pests on your plants is to avoid having them in the first place. Most often than not, the majority of pests plaguing indoor plants have been introduced by new plants coming into the family. So here is a step-by-step guide on how to do your best to avoid infecting your plant-family with bugs when introducing a new plant:
- Ensure that the plant you are buying is from a reputable seller. If possible, inspect the plant throughtly for any pests signs or damage before purchasing it from a physical shop.
- If you have received your new plant through the mail or have just gotten it home, give it a good drink – most plants are thristy upon arival.
- Place your plant in an isolated area and as far away as possible from your other plants (outside – if possible) for the next 24 hours until it has had some time to settle and is not too stressed.
- Now comes the bathing and repotting time. Ensure you have a proper soil mix for your new plant before starting.
- If your plant came in a potted medium, try to remove as much as possible from the old soil without damaging the roots. Dispose of the old soil immediately.
- Give your plant an insecticidal bath for 10 minutes. You can learn how to make insecticidal soap above.
- Repot your plant in a fresh potting mix.
- Isolate your new plant for a good month away from the rest of your plants and check for signs of pests or any fungal/bacterial deseases often.
- After you are sure that the new addition to your plant family is healthy and pests-free, you can introduce it to your other plants.
- If you have a dedicated indoor plant area, consider a: “no shoes!” rule for it. And if possible, do not enter it with clothes that you have used for outside. The reason being is that bugs (thrips, I’m looking at you!) usually fall on us while walking from trees and there is a good chance to take them home with us without noticing.
- Using predatory mites both curative and preventative is also an option.