If you feel like you want to go a step further than the usual plant in a pot situation, then building your own terrarium could be just the thing for you.
What is a terrarium anyway?
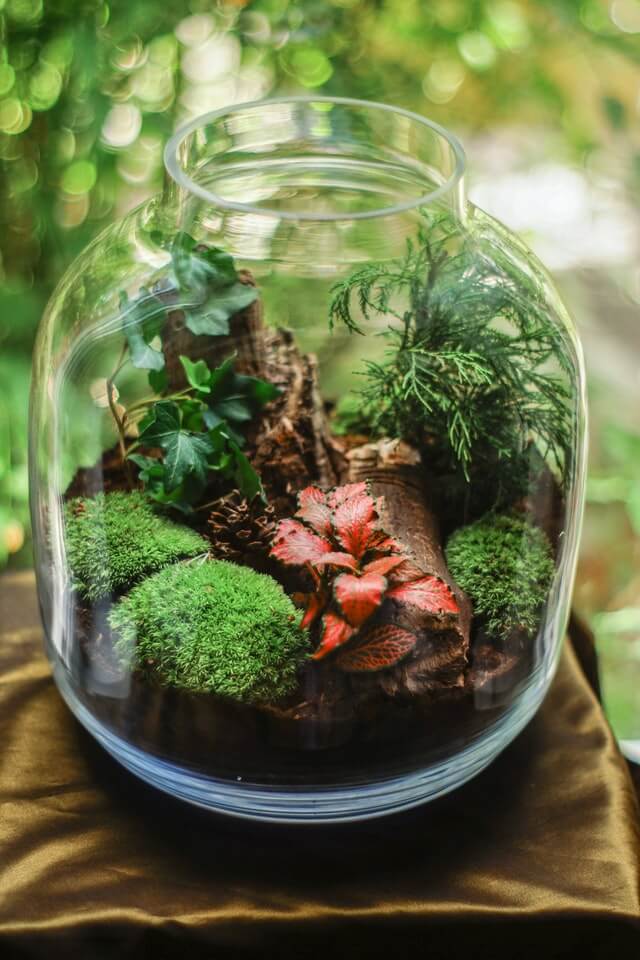
Terraria are glass containers that allow you to create a mini (or large, dependent on the terrarium size, of course) enclosed plant ecosystem. Think of them as a forest in a jar type of a thing where your gorgeous plants are on a display.
DIY terrarium is easy, fast and fun way to bring some nature indoors. Each terrarium is unique and you can decorate it in any way to suit your own personal style and taste.
Here are the basic things that you would need to make your own gorgeous little glass garden:
- Glass container – with or without lid
- Stones or pebbles for the drainage
- Activated charcoal
- Sphagnum-Moss
- Potting soil suitable for the plants to be grown in the terrarium
- Small tools to help you assemble your terrarium: for example, chopsticks, long spoons, tiny gravel
- Any decorations that you might want to integrate into your terrarium, such as: coloured stones, alive moss, little figures – your imagination is the limit!
- And the most obvious one: plants
The first step on building your own terrarium is to decide which plants will go inside. My personal advice would be to not mix and mingle and choose plants for a terrarium that have similar needs and environmental requirements. For instance, I personally find it best not to mix cacti and succulents with tropical plants. This is because the soil and water requirements of cacti and succulents are so much different than those of tropical plants.
So is just any plant suitable to be grown in a terrarium?
The short answer is no. The ideal plants to be grown inside a terrarium are those that are slow-growing and are still tiny (think, baby plants).
Here is an exemplary list of leafy plants that would be suitable for a DIY terrarium:
- Air plant (Tillandsia stricta)
- Nerve plant (Fittonia)
- Meadow spikemoss (Selaginella apoda)
- Polka dot plant (Hypoestes phyllostachy)
- Sweet woodruff (Galium odoratum)
- Earth star bromeliad (Cyrpthanthus)
- Inch plant (Tradescantia zebrina)
- Hen and chicks (Echeverias)
- String of turtles (Peperomia Prostrata)
- Most cacti and succulents
Choosing the right jar
Usually, we all have some glass containers lying around that are just gathering dust and waiting to be put to good use. You don’t have to be too picky when it comes to choosing the glass container for your terrarium, for example, old jars or large containers for cereals and pastas would work just as well as a specially bought glass container!
Pick any container that you have available and that is large enough for your plant or plants of choice and that still gives the little darlings inside some room to breathe and to you: enough space to reach the plants.
Should you choose a container with a lid or without?
If you plan to create a terrarium for cacti and succulents, opt not to close the glass container with a lid as these plants prefer less humid conditions. On the other hand, tropical plants, would love the extra humidity boos resulting from a terrarium with a lid.
So once you have a glass container and some plants on hand, it is time to create your very own DIY plant terrarium.
How to
Here is a step-by-step guide on how to set up and maintain your terrarium:
Step 1:
Wash your stones or pebbles from any dust particles and allow them to dry. After they have dried you can layer them on the bottom of your clean and dry chosen terrarium container. Make sure that they are covering the bottom 2-3cm.
Pots usually have a drainage hole where excess water can leak into, so that plant roots won’t be constantly sitting in water and so that there would be the opportunity of some salt wash off that might otherwise burn the roots. The stones/pebbles that you would be using are mimicking the job of a pot’s drainage hole.
Little hint: You can go creative at the very start here and turn your container sidewards so that the opening is not facing upwards and create a more-uniquely standing terrarium.
Step 2:
Add a thin layer of dry sphagnum moss. You basically want to just create a little cover on top of the stones so that the activated charcoal won’t fall through to the bottom but can stay where needed and do its job.
Step 3:
Add the activated charcoal by scattering it across the moss layer. Activated charcoal is an important part of a terrarium as it keeps your water fresh, keeps harmful bacteria and fungi away and neutralises unpleasant odours.
Note: you need activated charcoal for a terrarium, horticultural charcoal will not do the job.
Step 4:
Add another thin layer of dry sphagnum moss. This is to keep the soil from directly touching the activated charcoal and the nutrients being leached off.
Step 5:
Proceed with putting a layer of potting soil that is suitable for the needs of the plants chosen. Use potting soil that is slightly moist and use enough of a thick layer so that the roots of the chosen plant or plants will sit comfy deep inside it. Press the soil slightly to ensure that it would not sink too much after your plants go in and you have to water.
Step 6:
It is time to plant!
Your biggest plant should go in first. Use a long spoon, or if you don’t have one, the backside of a fork or spoon or chopsticks to make a hole large enough for the plant to be inserted inside. Gently place the plant inside and cover its roots with soil. Then, you can continue with the rest of your plants. Ensure that the plants are not cramped inside and that they still have some room to grow a bit. And best would be if the leaves of the plants are not directly touching the glass walls of the terrarium.
After all of your plants are in, make sure to give them a good sip of water with the help of a hand-held sprayer.
Step 7: Optional
After you gave your plants water, you can start ordering any decorations that you might want inside and do any finishing touches.
After all décor and plants are inside: close the lid or don’t!
Hint: green, fluffy moss makes a wonderful terraria decoration that you can easily find growing in a shadowy pot in your own garden or can be purchased online.
How to maintain and keep your terrarium alive
Position your terrarium in a location that is receiving bright, indirect sunlight. Avoid exposure to any harsh sun rays as most plants (yes, even cacti!) might get scorched by long exposure to direct sunlight. A spot that is not receiving enough light is not a proper place for a terrarium, so if you don’t have a location with natural light, consider supplementing your newly built DIY terrarium with a grow light.
Water your plants every couple of weeks or so by spraying the soil with a hand-held sprayer. Ensure that the whole potting soil is saturated but is not wet. In most cases, you need to spray your terrarium when the soil looks and feels dry to the touch. Since it is an enclosed system, you would need to water your plants inside less water compared to growing them in pots.
Keep an extra eye on closed terrariums: Ensure that your plants are not staying too moist inside. If there is a lot of condensation inside of your terrarium and the walls are moist and if it’s closed, open the lid for a couple of hours to allow the excess water to evaporate.